Discuss Shower tray installation in the Tanking and Wetrooms area at TilersForums.com.

J

Jrterror

Hello.
We are currently in the process of renewing our ensuite.
I have been trying to get to grips with the different types of shower trays and their methods of installation.
The shower tray that was removed; I believe was an acrylic tray. It was very light and was raised off the floor through the use of 3"x 2" timbers, with a plywood base sandwiched between the underside of the tray and the top of the 3x2s.
Is this type of installation typical for an acrylic tray? I was surprised not to find the tray raised on legs instead.

Anyway, that tray is going in the bin and we intend to buy new. So which type of tray would be best for sitting on top of and existing wooden floor. It will need raising, because of drainage pipework. But I can't decide upon which type of tray. Another acrylic, because it's lightweight or stone resin or stone cast. Can all stone resin trays be raised up on legs or timberwork? Are they self supporting? What I mean is, I read one manufacturers installation instructions and it stated it must be set on 5mm minimum concrete or on legs. I couldn't work out why it can be mounted on legs yet if installed without legs it must be bed on a concrete base.
So I suppose I'm asking which is the best installation method for each type of tray? Acrylic, resin, stone.
I thought it best to ask fitters rather than manufacturers because you fit them and have to deal with them day in day out.
Also, because the ensuite is in the first floor above the kitchen are there any other considerations. Maximum weights, or tanking or shower sealing tapes.
The have so many questions. Haha
Your help would be greatly appreciated
Ta
 
Q

Qwerty

If you're unsure then just choose the type of tray and then follow the manufacturers recommended fitting instructions.

If waste pipe or joist position is an issue then my choice would be pretty much the configuration you have now - build a timber frame, lay 18mm ply on top and sit a low profile stone resin tray on that, using either a flexible tile adhesive or flexible grab adhesive.
 
J

Jrterror

Thanks for the replies
Plan Tec. I was just wondering which is the best type of tray for our setting. Also, II don want to purchase a tray online, only to discover that it is not suitable for raising. Unless Al shower trays can be raised. The difficulty is finding installation instructions prior to purchase, to check the method of install.
Regarding your comment, is a timber support superior to legs? And why adhesive, instead of just sitting it on the ply?
Ta
 

Filip

TF
43
498
Midlands
I have fitted 3 mira flight trays and love the ones with 4 upstands Mira Flight - Square - 800 x 800 - 4 Upstands by Mira Showers - https://www.mirashowers.co.uk/shower-trays/mira-flight-square-800-x-800-4-upstands/.
The tray is chopped into the plaster so that the thin upstand/flange fits flush with the plaster then you tile down the plaster and down onto the tray - leaving 5 mm Silicon gap. The shower cubical fits inside the upstands meaning it is impossible for the cubical to leak at the bottom.
I dont trust the strength and stability of the leg kits - they are like kitchen cupboard legs and so prefer to use lengths of 3x2 ontop of the floorboards and 90degree to the joists. ontop of that I add 18 or 22mm ply and sit the tray on a bed of no nails type adhesive but really most of it squishes out and the tray sits on its slightly raised bottom form sections with the adhesive around those. I make sure that the ply is smaller than the tray to allow whatever cover panel I am using to sit nicely under the tray. One more thing is that the rubber seals that come with waste never seem to be watertight no matter how fancy they look so I use plumers gold Silicon in between every rubber seal on the waste
coram-shower-waste-and-trap-for-02208085L.jpg
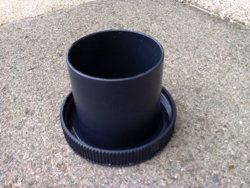
These type of waste I think are the best that have a hand tight base that you can remove to clean out. BUT make sure that your tray is high enough to allow for it to drop down once unscrewed or cut out a section in the floorboards to allow it. And make sure that you plan the wast position so that the waste is at one of the two sides just behind your covering panels
 
Last edited:

Filip

TF
43
498
Midlands
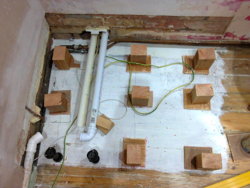
here is mine after it is removed and cleaned. And I have just found the pictures of the base. I did not want to block any view of underneath once the side access panels were off so I did not use lengths of 2x3 but instead used blocks first set onto 18 ply mats. I screwed the blocks from under the square ply mats and then screwed down from the top through the ply mats and into the floor then set the full 22mm ply base onto that.The photo is before anything was screwed in place, as I did not want to block my access to the waste I used two kitchen legs in that area but the heavy and strong tray on 22mm ply would of happily sat floating there.
You will also see that the pipe joints are only at the front so I can inspect them the 2nd pipe is the bath waste. The only thing that perhaps I should of done is use solvent weld.
I also sealed the floor below so that in the event of a leak it should show itself under the cover panels and not drip for months down to the ceiling below, I also painted the floor white so that it is nice and bright when I shine a torch under there

Photo1251.jpg Photo0689.jpg
 
Last edited:

Lakey

TF
24
478
Crawley
here is mine after it is removed and cleaned. And I have just found the pictures of the base. I did not want to block any view of underneath once the side access panels were off so I did not use lengths of 2x3 but instead used blocks first set onto 18 ply mats. I screwed the blocks from under the square ply mats and then screwed down from the top through the ply mats and into the floor then set the full 22mm ply base onto that.The photo is before anything was screwed in place, as I did not want to block my access to the waste I used two kitchen legs in that area but the heavy and stromg tray on 22mm ply would of happily sat floating there. I also sealed the floor below so that in the event of a leak it should show itself under the cover panels and not drip for months down to the ceiling below, I also painted the floor white so that it is nice and bright when I shine a torch under there

View attachment 97181 View attachment 97182

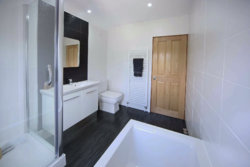
You could do with tanking that wall before tiling!
 

Filip

TF
43
498
Midlands
You could do with tanking that wall before tiling!
Yeh I know that now, I replaced that shower and old tiles that I had put up 10 years before and they were B@stards to get off and were bone dry underneath and they were 150x150 so loads of grout lines compared to the new ones at 400x250. How come they dont tank in new builds
 

Lakey

TF
24
478
Crawley
Yeh I know that now, I replaced that shower and old tiles that I had put up 10 years before and they were B@stards to get off and were bone dry underneath and they were 150x150 so loads of grout lines compared to the new ones at 400x250. How come they dont tank in new builds

I think you'll find time and money are more important than reputation and customer satisfaction with new builds.
Just look at the length of snagging lists on new builds when people move in....and thats only for the visible things!!
 
J

Jrterror

Hi. Once again thanks for the replies. Keep them coming.
Kaley. I've always wondered why shower trays don't come with a raised lip, then discovered that some do. I then investigated them further and found quite a few complaints. I would have thought that the four rim ones would solve a lot of issue at the intersection of the door frames and the tray. Especially since you are supposed to seal only the outside of frames.
What's the opinion of you fitters on these raised lip trays. I already have walls plastered and unsure at this point if they are square and true. If owt like everything else in this house, they won't be.
Ha
 

Filip

TF
43
498
Midlands
I am not a fitter just a big DIYer. And fitted 3. My walls were not square but with thick plaster /sand cement on one wall that gave me some play I just had to build out one wall with plaster to square it off for the tray.
I just think that the bead of Silicon on the outside of a flat top tray will leak sooner or later and depending how well or not it is done can look a mess and gets dirty. You also sometimes get splash ups go under the bottom of the door depending on the fit. The only thing with a 4 upstand is that you have to make sure that there is enough room to get in-between the cubical and upstand so you can clean it,tissue wrapped around a kebab skewer sort of thing or a narrow long bristled scrub brush.
 
Last edited:

Reply to Shower tray installation in the Tanking and Wetrooms area at TilersForums.com

Subscribe to Tilers Forums

There are similar tiling threads here

Hi I have a wetroom tray on timber floor. We have an impey shower tray and tanking membrane...
Replies
5
Views
3K
    • Like
https://www.tilersforums.com/threads/shower-bath-tiling-preparation-plaster-and-wooden-windowsill...
Replies
1
Views
1K
Hey. I doing my first walk-in tiled shower. The shower is 4’x8’. Most of the floor is covered...
Replies
1
Views
968
    • Like
Hi, We're currently adding an en-suite to a downstairs bedroom, everything is going well so far...
Replies
8
Views
807
Hi all, I'm an enthusiastic DIY'er (first time poster) who has been slowly chipping away at an...
Replies
10
Views
221

Advertisement

Thread Information

Title
Shower tray installation
Prefix
N/A
Forum
Tanking and Wetrooms
Start date
Last reply date
Replies
15

Which tile adhesive brand did you use most this year?

  • Palace

    Votes: 9 6.1%
  • Kerakoll

    Votes: 14 9.5%
  • Ardex

    Votes: 11 7.4%
  • Mapei

    Votes: 44 29.7%
  • Ultra Tile

    Votes: 17 11.5%
  • BAL

    Votes: 35 23.6%
  • Wedi

    Votes: 3 2.0%
  • Benfer

    Votes: 2 1.4%
  • Tilemaster

    Votes: 21 14.2%
  • Weber

    Votes: 18 12.2%
  • Other (any other brand not listed)

    Votes: 15 10.1%
  • Nicobond

    Votes: 7 4.7%
  • Norcros

    Votes: 3 2.0%
  • Kelmore

    Votes: 4 2.7%
Top