Discuss Replace Part of Cellular Core Wall in the Canada Tile Advice area at TilersForums.com.

W

WillIt

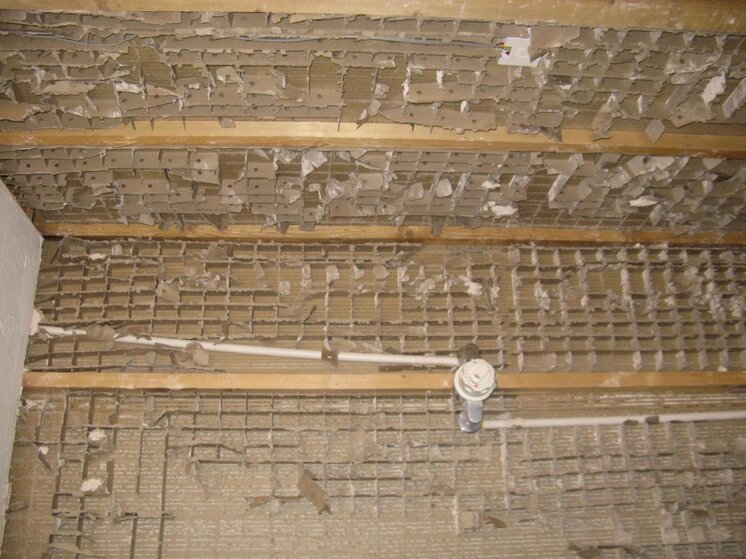
Hi All. I've been working on our recessed shower area and after taking off the tiles found that the plasterboard was not waterproofed and needed replacing so have removed it. On one side it was plasterboard dot and dabbed onto a breeze block wall so no problem to replace, but the other sides were part of a cellular core wall. Having removed that I'm now not so sure about what to put back. Ideally I don't want to have to remove the other side of the cellular core wall which is perfectly ok (in order to put back another cellular core wall which I don't even know where I can buy) but obviously the wall framing is not as substantial as it would normally need to be for a stud wall to just replace the plasterboard on (35mm square studs and no noggings). Hopefully someone has some useful advice on what the best way forward might be. Thanks in advance
 
B

Bubblecraft

Hi & welcome to TF. Cellular core walls can be a nightmare. Have you actually removed all the plasterboard on the bathroom side including the cardboard honeycomb back to the other plasterboard sheet or is the plasterboard just patchy where the tiles have been removed?

Are you able to post up a pic or 2 so I may be able to advise better?
 
Last edited by a moderator:
W

WillIt

Hi Bubblecraft. Hopefully I can add a picture (we'll see). It shows the two walls that used to be cellular core walls and are now just a bit of the cardboard centre and of course the platerboard on the other side. The shower area is 90cm x 90 cm, for orientation the left of the picture is the ceiling. Hope that helps, sorry it's such a tiny picture
IMG_1030.jpg
 
W

WillIt

Whitebeam - yes, the shower leaked so some of the plasterboard was not good and I thought replacing all of it would be safer than not knowing which bits were good or bad. Was mostly lower down that the plasterboard was definitely not good but the cardboard honeycomb stuff and the other side of the plasterboard are fine (and all the framework)

Bubblecraft - I was thinking of Travertine but obviously that's a pretty hefty weight so I'd need to be pretty sure things were sound. My first guess was to double up the studs i.e. put another 35mm square strud next to each of the existing ones nailed together, then add noggings and add some adhesive to each of the noggings to stick to the back plasterboard (to make up for it's lost cellular core) and obviously plasterboard screw into the studs and noggings for the new 12.5mm plasterboard that I put up. That's really a put my finger in the air guess but thought for such a small area it would probably be enough
 
B

Bubblecraft

If I were you, I would add additional 4" x 2" studs to the side of the existing 35mm studs you have. Jointing 2 pieces of 35mm timber on top of each other will be too weak & flexible. Also add 4" x 2" noggins & fixing to ceiling & floor.

Travertine is far too heavy for 12.5mm plasterboard. Weight limit for bare plasterboard is 32kg pm2. Your Travertine including adhesive & grout will fall under one of these category's:

10mm Stone - 35.30kg pm2
12mm Stone - 40.68kg pm2

You will have to sheet with Hardibacker 500 which is a 1200 x 800 x 12mm board in order to carry that sort of weight. It will carry up to 45kg pm2. Your centres will need to be 400mm apart.
 
Last edited by a moderator:
W

WillIt

Thanks very much Bubblecraft, that sounds like some rock solid advice. Just wanted to run through exactly what I'll be doing to make sure I've got your meaning. The sill of the frame is 2", on top of that is 2x35mm square locating blocks that the cellular core was located onto and the 35mm studs go up from there. I'll be cutting some sections of 2x4" to fit on top of the 35mm locating blocks and between the current 35mm studs so cutting them much like the noggings to fit the spaces. Similarly add the same 2x4" pieces at the celing and these will be used to give the hardibacker good connection near the top and bottom. The new 2x4" studs will join into these. The reason for the 2x4" pieces on top of the locating block and at the ceiling is because the new 2x4" pieces will all be proud of the sill and head (by about the size of the 12.5mm plasterboard on the other side of the wall) so the hardibacker can't actually be attached to the head and sill directly but will instead be attached to these new pieces near them. Some of the new studs I'll put in places other than next to the existing 35mm studs to make sure I can get the 400mm centres without getting in the way of the existing pipe work. Have to say that beats my original thought of what I'd do by a fair way and makes me feel more comfortable that it might stand up! Presumably hardibacker is similar to plasterboard when it comes to tanking so using something like the Mapei shower waterproofing kit would be a good solution for no more leaks in the future!
 
B

Bubblecraft

You've more or less got it. As long as your new 4" x 2" frame is secured to your 35mm studs (to the side to take up less floor space), ceiling & floor with screws, noggins are glued (grip fill or pink grip) to your existing plasterboard & screwed to your uprights @ 400mm centres, you will not have any problems securing your hardibacker to a sound subframe.

Hardibacker is a moisture resistant board but as you wish to fit travertine which is an extremely porous stone, you have choosing a good method of waterproofing by tanking. It will take to your hardi no problem.

On your breeze wall though, unfortunately, you cannot dot & dab hardi. You will have to knock up a frame. Manufacturers guidelines are 4" x 2" frame. If you can get away with this size of frame, then please do it. If not, you can fit 2" x 2" with good fittings & plenty noggins.

Hope this helps

Here's the tech sheet for hardi 500
broken link removed
 
Last edited by a moderator:
W

WillIt

I think I'm going to wimp out of the travertine and go for something more ordinary weight as the shower cubicle isn't that large anyway so trying not to cut down the space too much and I think it would look a bit funny having the tiles so far proud of the rest of the wall. Thanks for your help and thanks to the people who run this forum - it's a good place and I'm glad it's here
 

Reply to Replace Part of Cellular Core Wall in the Canada Tile Advice area at TilersForums.com

Subscribe to Tilers Forums

There are similar tiling threads here

This is my first time posting, I searched for a similar thread and didn't find much- apologies...
Replies
3
Views
3K
    • Like
    • Useful
Hi, Im looking for a recommendation for a liquid tanking. I have to use a liquid tanking...
Replies
1
Views
708
Hi, I'm trying to assess what prep is needed on the walls for my kitchen backsplash. We'll be...
Replies
6
Views
2K
I will be tiling with 60*30 procelain tiles. They weight about 3.57kg each which is about...
Replies
2
Views
829
Hello, we have recently had some carpet fitters in who have done a great job but have...
Replies
8
Views
2K

Advertisement

Thread Information

Title
Replace Part of Cellular Core Wall
Prefix
N/A
Forum
Canada Tile Advice
Start date
Last reply date
Replies
11

Which tile adhesive brand did you use most this year?

  • Palace

    Votes: 5 5.0%
  • Kerakoll

    Votes: 8 8.0%
  • Ardex

    Votes: 6 6.0%
  • Mapei

    Votes: 24 24.0%
  • Ultra Tile

    Votes: 14 14.0%
  • BAL

    Votes: 28 28.0%
  • Wedi

    Votes: 3 3.0%
  • Benfer

    Votes: 2 2.0%
  • Tilemaster /Kelmore

    Votes: 19 19.0%
  • Weber

    Votes: 18 18.0%
  • Other (any other brand not listed)

    Votes: 11 11.0%
  • Nicobond

    Votes: 5 5.0%
  • Norcros

    Votes: 3 3.0%
Top