Discuss Squaring up a room for matching wall and floor tiles in the Best Floor Tiles area at TilersForums.com.

D

discoduster

Hi

Had my first tiling job in about a year (seem to be doing Safety Flooring all the time now) and it seems I've forgotten everything!

The client gave me 330 x 330 tiles which they wanted on the floors and walls and the contours of the joints to match so they run down the wall on the floor and up the other side.

It was a small bathroom and luckily was given 4mm spacers. I had to make the joints on the floor slightly bigger (an extra mill at the most) and I got away with it but if I had to do it again on a bigger room Id like to set it out better to ensure it all matches lovely.

Any tips, please.
 
W

White Room

Would mark out tile's on floor then follow onto wall's checking what cut's you may get, It may mean you have rearrange your setting out on the floor and keep joint's the same size. Start tiling wall's and keep checking that you are following the line's on the floor. Some guy's tile the floor first then the wall's.
 
D

Daz

It's always best to do the floor last, because your focal points are 9 times out of 10 on the wall. Obviously, take both into account when setting out though.

I, usually use a laser so that I can transfer my lines easily and it helps ensure good cuts.

The only time I have done a floor first was when the builder insisted and, as it was a wet room, the floor was dictated by the drain. Luckily the walls worked out great and the job looked superb.
 
S

sWe

Reusing some old material here. Sorry 'bout that.


There are a few things you need to consider when centering tiles on a surface. Here's the method I use.

First you need to measure the surface. If there are multiple surfaces to be tiled, like in most bathrooms, and both the floor and the walls are to be tiled, begin with the walls.

Remove say 6mm from that number for 3mm margins on both sides of the surface, as tiles could come loose or crack from building movement otherwise. Then divide that number with the width of one tile plus the width of the grout. That give you the number of tiles you'll be able to slap onto that surface. Here's what to do next:

1. If the number of tiles is a whole number, say 11, just go ahead and use whole tiles all the way if the corners are perfectly square. If the decimal numbers are very low, or very high, say 11.1 or 10.9, then you might be able to compensate by altering the width of the grout lines. This, of course, depends on the size of the surface, the size of the tiles, and the customer's wishes.

Pretty much self explanatory.

2. If the number of the last whole tile you can fit onto the surface is UNEVEN, for example 5.4, then you can go ahead and just mark out the centre on that surface, unless 1. is applicable. This is because the border tiles will always be half of a tile (which can only happen if the number of possible tiles is a whole number) or LARGER. The centre of the surface is found by dividing the width by 2.

3. If the number of the last whole tile you can fit onto the surface is EVEN, for example 4.7, then you need to approach it sligthly differently. I will get to how in a sec, but as to the why, it's because the border tiles will always be half of a tile (for the same reasons stated ), or SMALLER, if you work from the center of the wall.

Instead, you need to offset the centre of the wall, and work from the center of the middlemost tile. You can just adjust it so that it sits centralized on the centerline, but if you want a "dividing" line to work with, you can do like this:


Divide the width of the surface by two, and then substract (or add) the width of half a tile. Mark the result on the surface, and work from there. You just made an offset central marking. It's offset by half a tile, and thus, the border tiles will be half a tile or larger.

If you want to check that your markings are correct (without laying the tiles out), and that the border pieces really are as big as they can get, here's one way:


Add 1 to the decimals from the result of the calculation where you figured out the number of possible tiles.

For example, if the result was 6.7 tiles, then do 1+0.7. That gives 1.7. Multiply 1.7 with the width of one tile, and then divide that number by 2. The result is the largest possible width of two equal sized border tiles. Mark them out on the surface if you want additional guide lines.


I probably don't need to say it, but all of the above works vertically as well as horizontally.

If the wall tiles are matched by the floor tiles, then just continue the wall markings on the floor.


I've probably made lots of spelling errors etc, because it's in the middle of the bloody night, and I can't sleep... I'll catch those tomorrow...
 
Last edited by a moderator:
M

MICK the Tiler

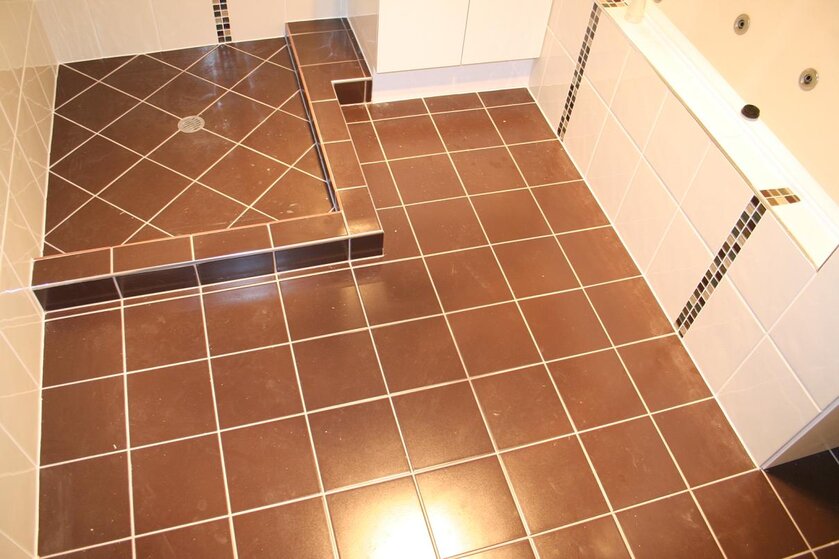
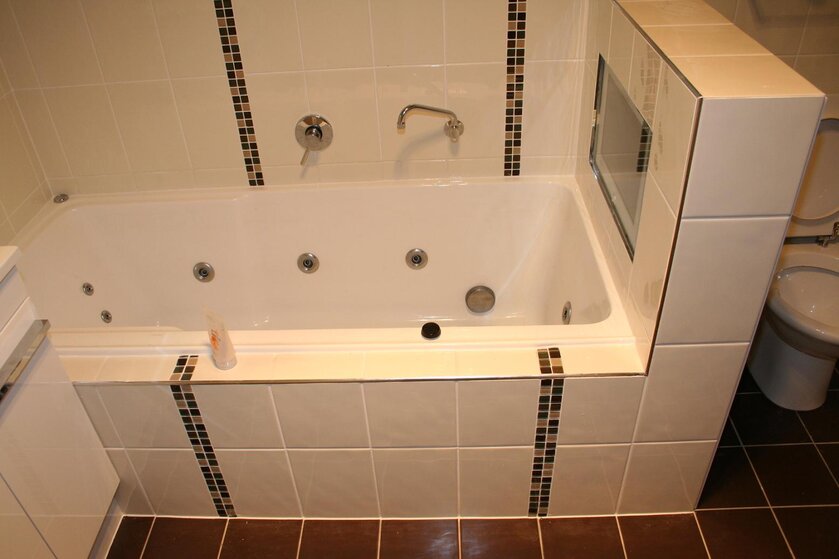
I would mark out the walls first verticall and horzontal allowing for cuts and obstructions then transfer to floor making sure everthing works with cuts, then i would always tile the floor first.

If you feel you could do more than this in the day tile the leading wall followed by the floor but leave the opposite and adjacent walls for the following day. then all you have to do is plumb up from the floor for the other walls.

If you do the walls first you might run into problems if you get some tile drift on the floor or one or more walls run out of parallel by doing the floor first it does not matter you simply plumb up from the floor no matter how far out of paralell the walls are.

Here's a couple of pics where floor lines up with walls the floor was done first because you would complicate things alot more if you tried to tile the walls first. There are just too many variables like the bath , shower tray. toilet niche let alone the room being paralell and square.
 

Attachments

  • bathroom1.jpg
    128.3 KB · Views: 130
  • bathroom2.jpg
    123.9 KB · Views: 110
Last edited by a moderator:

Reply to Squaring up a room for matching wall and floor tiles in the Best Floor Tiles area at TilersForums.com

Subscribe to Tilers Forums

There are similar tiling threads here

Hi all I’m so glad to have stumbled upon this forum, which seems to be a treasure trove of...
Replies
5
Views
3K
gamer1
G
We recently completed the (rectified porcelain) floor tile installation in the bathroom and...
Replies
0
Views
2K
Just seen Rocatex on uHeat.co.uk and thought hmmm that's a new one on me. Anybody used it yet...
Replies
3
Views
2K
Hi All So around 10 years ago (i had no idea it was that long ago until i looked up the order...
Replies
8
Views
3K
Are there any BS standards covering this please I have recently had 3 sides of a shower tiled...
Replies
9
Views
4K

Advertisement

Thread Information

Title
Squaring up a room for matching wall and floor tiles
Prefix
N/A
Forum
Best Floor Tiles
Start date
Last reply date
Replies
8

Which tile adhesive brand did you use most this year?

  • Palace

    Votes: 9 6.2%
  • Kerakoll

    Votes: 13 8.9%
  • Ardex

    Votes: 11 7.5%
  • Mapei

    Votes: 44 30.1%
  • Ultra Tile

    Votes: 17 11.6%
  • BAL

    Votes: 34 23.3%
  • Wedi

    Votes: 3 2.1%
  • Benfer

    Votes: 2 1.4%
  • Tilemaster

    Votes: 20 13.7%
  • Weber

    Votes: 18 12.3%
  • Other (any other brand not listed)

    Votes: 15 10.3%
  • Nicobond

    Votes: 7 4.8%
  • Norcros

    Votes: 3 2.1%
  • Kelmore

    Votes: 4 2.7%

Birthdays

Top