Discuss Herringbone walls ! The definitive answer? in the Canada Tile Advice area at TilersForums.com.

macten

TF
Esteemed
Arms
1,871
1,158
Nottingham
I've committed to my first 450 herringbone job - will be 3 walls of a shower enclosure with little 2x6 inch tiles.
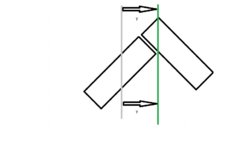
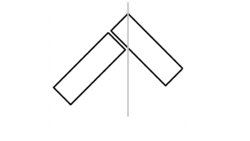
Lots of advice out there tells you to find the midpoint of the wall and keep the tile points to this plumb line:
New Bitmap Image 1a.jpg
From all the google images of jobs where this has been done I noticed that it gives unequal cuts at the sides which I don't want.
After searching for ages I found this gem of a post:

Dont start with tile points on centre line or you'll get different size cuts either side

Theres 2 ways set out herringbone on a 45
First is to draw a line down the centre of a tile at 45 degree's and line that up on your centre line. Cuts will be equal sizes but opposite way around.

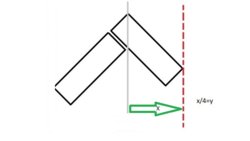
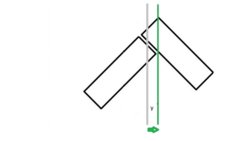
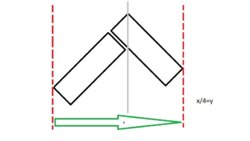
Second way to get the cuts the same way so they are like wings ( best way imo) is a bit more complicated to explain easy to show. Set two tiles herringboned and measure the distance between the points of each tiles but parallel. Then quater it and measure that distance off your centre line and thats you new line to start from off the points. If that makes sense

For example I use alot of 3x9 inch parquet tiles so id be starting 26mm off my centre line to get equal cuts on each side going the same way

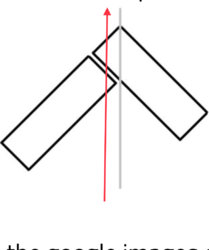
So I'm just after some clarification that I've got this right in my head:

New Bitmap Image 1b.jpg

New Bitmap Image 1c.jpg
If @Spacey360 or any other guru can confirm that's right then please post!!


L

LM

62B47D53-7BCB-40B2-A6A4-D33B05A18723.jpeg
I've committed to my first 450 herringbone job - will be 3 walls of a shower enclosure with little 2x6 inch tiles.
Lots of advice out there tells you to find the midpoint of the wall and keep the tile points to this plumb line:
View attachment 100105
From all the google images of jobs where this has been done I noticed that it gives unequal cuts at the sides which I don't want.
After searching for ages I found this gem of a post:


So I'm just after some clarification that I've got this right in my head:
View attachment 100106

View attachment 100107
If @Spacey360 or any other guru can confirm that's right then please post!!


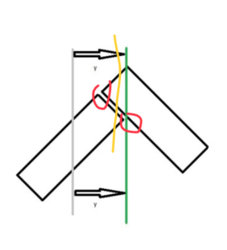
To get it centre you line up in the middle of the two red circles, somewhere like the yellow line that I’ve tried to draw on my phone.
 

macten

TF
Esteemed
Arms
1,871
1,158
Nottingham
Tray will be spot on level as I will fit it and I'm aiming to wrap it round the 2 side walls if the boarding is spot on. Unfortunately I'm not doing that bit as I'm stacked out. Won't be doing it till end of September. If the boarding is rubbish then I will have to frame the walls but I love the look of it wrapping round.
 

macten

TF
Esteemed
Arms
1,871
1,158
Nottingham
Okay so using spacey's 3x6 inch parquet example giving 26mm I cut a couple of bits of paper to size to see what points he was measuring to get 104mm.

So this is what I should be measuring:

1.jpg

Which gives what Lee Mac says:

2.jpg
And this gives equal cuts with both sidesgoing the same way.
 
L

LM

I’ll try and explain this in a more simpler way.
In the above diagram take the top tile. Take the two highest corners of that tile and draw two lines straight down from each of those corners, find the middle of those two new lines and then draw another line, then move the tile over (maintaining the 45 degree angle) so as that last line drawn is centered over the center line of the wall/floor that you are tiling and you’ll then find that you’re cuts either side are equal. If that doesn’t explain it I give up :(
 

macten

TF
Esteemed
Arms
1,871
1,158
Nottingham
think you were right 1st time. the line down the centre of the tile at 45d moves over to your centre line on the wall. is that what you mean?

That would give you equal cuts both sides but those cuts would be going in opposite directions to each other.
 
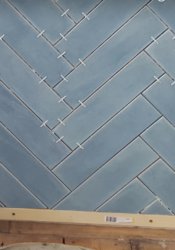
Just make sure when you get to the corners you follow around otherwise it looks like crap.Start on the wall that is the feature(biggest wall or the one you see most)
Simetimes not centering is better because it wraps around corner better.I dry lay on the floor each time I do it easier than trying to mathematically trying to work it out(get a better visual of how small the triangles are going to be).Make sure you use a laser to the tips,Goes out real quick if you don't.
 

Reply to Herringbone walls ! The definitive answer? in the Canada Tile Advice area at TilersForums.com

Subscribe to Tilers Forums

There are similar tiling threads here

Hello, I am looking for some advice on how to set out my tiles. I think I have a solution but...
Replies
1
Views
2K
Doing a herringbone wall 60 x 240's , got Centre and offset it for equal cuts but cuts arnt...
Replies
11
Views
4K
I have a small ensuite that is 1950mm on 2 sides, the other two sides are 1850mm. I have 800mm...
Replies
2
Views
1K
Alan Bentley
A
Hi, Im tiling the bottom third of the bathroom wall in a straight herringbone (where the tiles...
Replies
2
Views
8K
Hi guys hopefully someone can help I’m tiling a splashback starting in center of wall which is...
Replies
2
Views
832

Advertisement

Thread starter

macten

Esteemed
Arms
TF
Joined
Location
Nottingham

Thread Information

Title
Herringbone walls ! The definitive answer?
Prefix
N/A
Forum
Canada Tile Advice
Start date
Last reply date
Replies
87

Which tile adhesive brand did you use most this year?

  • Palace

    Votes: 8 5.9%
  • Kerakoll

    Votes: 13 9.6%
  • Ardex

    Votes: 8 5.9%
  • Mapei

    Votes: 39 28.7%
  • Ultra Tile

    Votes: 16 11.8%
  • BAL

    Votes: 34 25.0%
  • Wedi

    Votes: 3 2.2%
  • Benfer

    Votes: 2 1.5%
  • Tilemaster

    Votes: 20 14.7%
  • Weber

    Votes: 18 13.2%
  • Other (any other brand not listed)

    Votes: 15 11.0%
  • Nicobond

    Votes: 7 5.1%
  • Norcros

    Votes: 3 2.2%
  • Kelmore

    Votes: 4 2.9%
Top