Tiling around the shower valve.

UK Tiling Forum; Established 2006

Welcome to the UK Tiling Forum by TilersForums.com, built in 2006 by Tilers, run by Tilers.

View all of the UK tiling forum threads, questions and discussions here.

Tilers Forums Official Sponsors

B

bevo09

This might seem like a stupid question, but if you dont know (which I dont) then ask!

The problem I have is with the tiling around the shower valve head.

If all goes well I will be boarding and tanking tommorrow and tiling over the weekend.

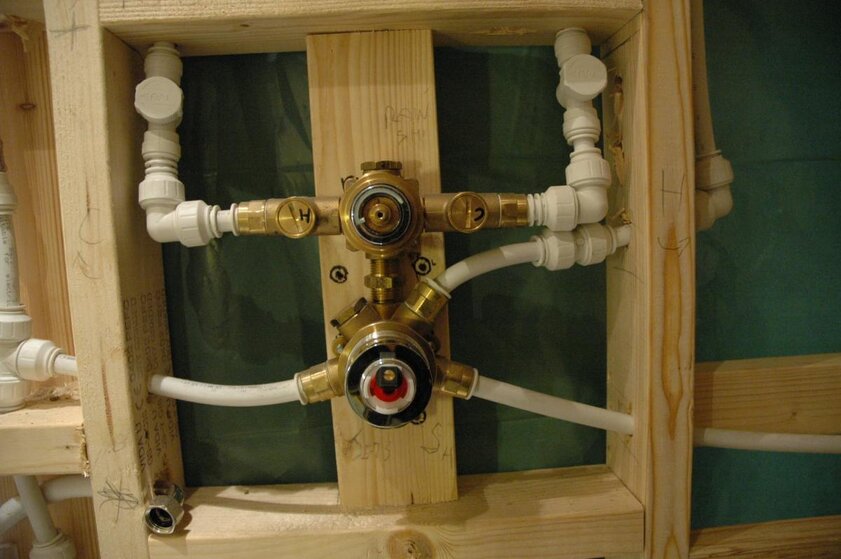
I have an Triton Archetto mixer valve, I have access to the rear of the valve via a inspection cover which we will hang a mirror over to hide it.

Do I need access to the front as well as the inlet ports have got some kind of screw heads on them.

The valve head has two controls, temp and the divertor which have a large plate that fix over them which is secured with two locking rings with O rings which screw over the valves and seal onto the plate.

Do I cut two round holes to allow the valves to come thru or do I cut a square hole slightly smaller than the plate and seal it to the tiles with silicon, which would allow access to the front of the valve.

Any advise on this?

John
 

Attachments

  • DSC_0001.jpg
    DSC_0001.jpg
    99 KB · Views: 237
  • DSC_0003.jpg
    DSC_0003.jpg
    92.7 KB · Views: 152
Both methods are acceptable.

We produce diamond drilling kits so you can drill neat holes through the middle of a tile to fit shower valves. You then just put the cover plate over.

The shower controls will allow you to adjust the temperature.
shower1.jpg

In this photo the shower valve has been sealed in permenantly with the caping plate covering two holes drilled into the tile right in the middle of the tile.

shower_pipework.jpg

This is a bit of an awkward photograph to understand

In this photo of a different shower (which is two photos joined together) you can se e the front and the back of the shower. Access to this mixer valve is easy - the back of the shower is inside a cupboard! So all the fittings are exposed. The front of the shower is neat and minimal with round holes drilled into the tile so that the valves are perfect in the middle of the tile. Note all controls are round.

Dsc07710.jpg


Our kits are also cabale of making a hole that is too small to begin with, then to open it out to the correct diameter. See shot above. A lot of people buy our all in one set and then use the largest 40mm core to open up holes to fit shower valves. They then go on to use the rest of the kit to make the other holes for service pipes and then of course fixtures and fittings.

kit2.jpg


Your second option is to grind out a rough square for the pipework to come through.

5.jpg


Like this.

Hope the advice is useful. Showing you both options, not trying to sell you anything you wont use or dont need. Hope it helps.

 
Hi thanks for the info.

So I do not need to leave space for access from the front then?

I already have a diamond drill for the body jets and the shower inlet(I think it is a Bora?)

The valves need an 45mm dia and 55mm dia hole, looking at the kit you show it only goes upto 40mm.

So I need to drill two holes in the tile, pop the valve in, fit the cover plate secure with the chrome looking rings. The locking rings have rubber O rings to seal against the cover plate, do a silicon the valve body where it comes thru the hole in the tile and do I silcon the cover plate onto the tile?

I shall make sure that the cover plate fits onto one tile to miss any grouting.

Is the right way?

John
 
Yes when I did it I decided on a permanent fix.

1) Built shower frame
2) Connected all pipework
3) Installed hardware (same as you) prior to tiling
4) Tested system for leaks. (Ran shower but caught the water in a bucket)
5) Tiled wall.
6) Drilled holes into tiles and slipped over shower valves and body jets.
5) Let adhesive set. Grouted tiles.
6) Silicon filled all the joints BEHIND the cover plates.
7) Pushed cover plates over valves.

If anything goes wrong with the unit after tiling then its fairly hard wired into the build so its a bit of a one time operation. (Dont get it wrong - no leaks!)

shower_coverplate.jpg

This is the coverplate pressed onto the tile. Behind it is a bead of Silicon but the Silicon is not "On Show". Because I didnt want to see a Silicon run.

shower_bodyjet.jpg

This is the bodyjet with the coverplate pulled back and the screws exposed. Again some Silicon BEHIND the joints because didnt want to see any Silicon.

55mm.jpg

Of course we do every single size drill for tiles so we do have them available to other people who might want to attempt shower valves.

PS: Sorry about the grotty looking chrome-ware on the shots. The shower is now 5+ years old and needs a bit of a descale!!
 
Thank you.

I understand now. (always takes me a wee while!)

I might leave the cover plate off as it is quite large and just go for the valve covers.....looks much better.

Thanks again.

John
 
The 2 screw heads on the inlets are likely to be the inlet filters. If you can leave access to these then it's worthwhile.

It looks like you've also got isolation valves on both the H & C feeds as well. If you're likely to need access to them you could turn them around so that they're accessible from the rear via your removable panel.

Mark.
 
Yes when I did it I decided on a permanent fix.

1) Built shower frame
2) Connected all pipework
3) Installed hardware (same as you) prior to tiling
4) Tested system for leaks. (Ran shower but caught the water in a bucket)
5) Tiled wall.
6) Drilled holes into tiles and slipped over shower valves and body jets.
5) Let adhesive set. Grouted tiles.
6) Silicon filled all the joints BEHIND the cover plates.
7) Pushed cover plates over valves.

If anything goes wrong with the unit after tiling then its fairly hard wired into the build so its a bit of a one time operation. (Dont get it wrong - no leaks!)

shower_coverplate.jpg

This is the coverplate pressed onto the tile. Behind it is a bead of Silicon but the Silicon is not "On Show". Because I didnt want to see a Silicon run.

shower_bodyjet.jpg

This is the bodyjet with the coverplate pulled back and the screws exposed. Again some Silicon BEHIND the joints because didnt want to see any Silicon.

55mm.jpg

Of course we do every single size drill for tiles so we do have them available to other people who might want to attempt shower valves.

PS: Sorry about the grotty looking chrome-ware on the shots. The shower is now 5+ years old and needs a bit of a descale!!

Always cool to see posts like this. Nice one R.
 
i agree with mark, the cover plate is designed so you can still gain access to the inlet filters. i'd cut a big square, just in case. :thumbsup:
 
why cut a square when you can drill a hole in the tiles in seconds with the 365 drills...have you used them yet Biffa?They are excellent..loads of holes on ceramics and a good few on porcelain.
 
i do have a set brian, and i agree they are excellent. just think you should leave the shower valve serviceable, especially in hard water areas.
 

Advertisement

Thread Information

Title
Tiling around the shower valve.
Prefix
N/A
Forum
UK Tiling Forum
Start date
Last reply date
Replies
10

Thread Tags

Advertisement

UK Tiling Forum

Thread statistics

Created
bevo09,
Last reply from
Mark B,
Replies
10
Views
22,696

Thread statistics

Created
bevo09,
Last reply from
Mark B,
Replies
10
Views
22,696
Back