UK Tiling Forum for UK Tile Advice

Comply with UK Tiling Standards and Research Tiling on your UK Tiling Forum. The tiling community that provides free wall and floor tile fixing advice to the United Kingdom.

Discuss Advice needed please! Stone, plaster, block in the UK Tiling Forum area at TilersForums.com.

A

Alexyz

Hello all, I'd really appreciate some advice about my bathroom. What was meant to be a simple job only gets bigger and bigger...

About me:
I have little experience but I have been on the phone to my DIY-mad Dad a lot for advice, but it seems I could now really do with the advice of the experts. I would now pay an expert to finish it for me if I could afford it, but I can't afford it, and I enjoy learning about construction this way anyway because I worked in the industry on the office side of things (though unemployed at the mo due to recession).

About my bathroom:

The bathroom was tiled in thin ceramic mosaic before. I have removed the mosaics because the stone supplier told me the weight may be too much for the stone (400x400x10mm slate). I perhaps wrongly assumed that the supplier meant that if I removed the old tiles the weight would be fine...

So I removed the old tiles. Where the plaster beneath sounded hollow I did as Dad advised by taking off the old finishing plaster, applied PVA:water 1:3 mix, and replastered myself (which was stressful as the wall dried the plaster out so quickly making it really hard to work).

However, after some online research I read that plaster substrate isn't recommended for 10mm stone tiles. Oops!

Do I really have to rip off the plaster? :sad3: I really need a bath!!!

Please see my pictures and my notes:
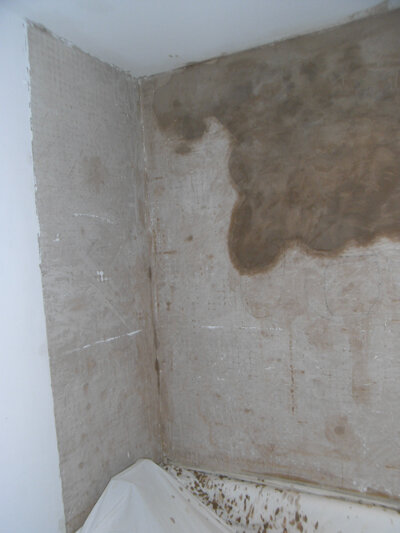
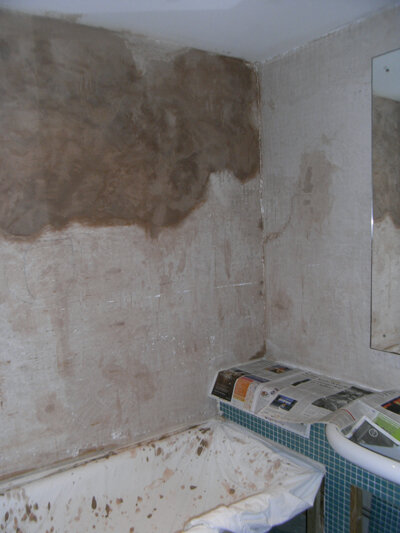
-A, B and C show the walls I'm wanting to tile, A and B with the finishing plaster replaced and the third wall C with some small gaps still there. All are solid walls, most probably blockwork.
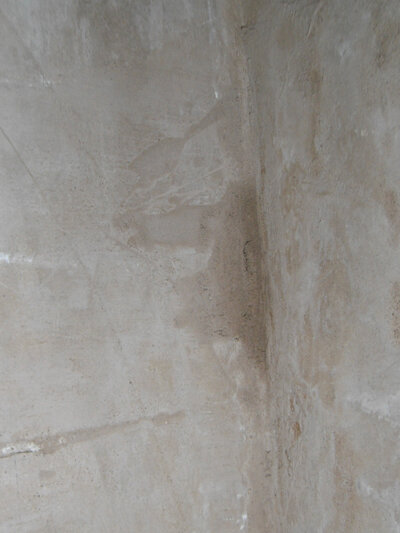
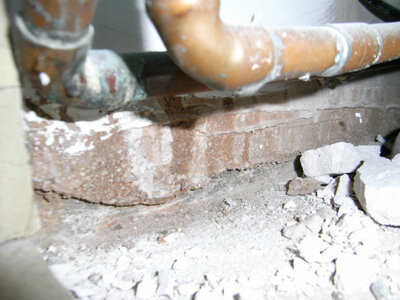
-D shows one of the now filled-in pathces down the corner where I guess water had penetrated through the old grout and damaged the plaster.
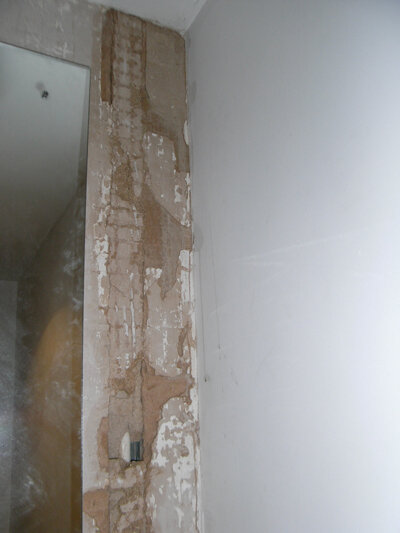
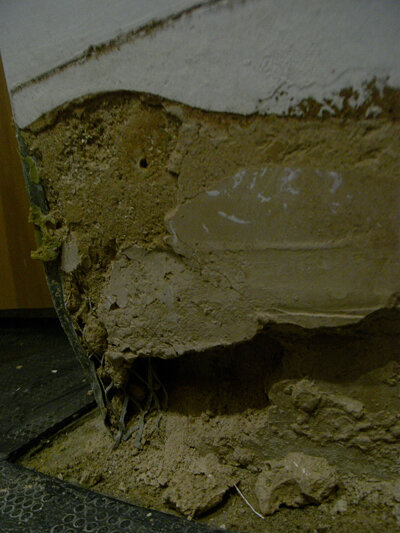
-E shows the corner of the door opening near the bath taps behind the skirting board to show how thick the existing plaster might be. There is 25mm of plaster on the existing blockwork.
-F shows the bottom of the wall under the bathtaps, which is the same wall as shown in E. There is only 6mm of finishing plaster here before what feels like concrete. However, as patces like this seem to run only beneath the bath and shelf hiding the cistern, I wonder if these just aren't infill from renovation, maybe when old skirting boards were ripped off and gaps in the plaster at the bottom filled when the screed floor was applied?
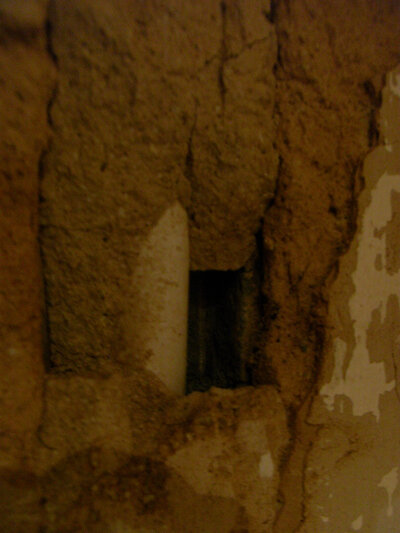
-G shows a hole above the shaver socket, diagonally opposite corner of the room to the bath taps. Here the plaster is 17mm thick over the blockwork (14mm plaster and 3mm finishing plaster).
-I have already bought the 400x400x10mm slate tiles, PCI Tilefast 6 Flex and Groutfast 6 grey on the suppliers advice.

What should I do? Ideally I'm hoping that you're going to say that I don't have to rip off the old plaster, although I'm expecting that I do from what I've read.

I read that "theoretically" stone tiles can hold themselves up if tiled all the way down to the floor, so I was wondering if I could get away with tiling onto the plaster if I made sure the tiles were grouted directly on top of the the steel enamel bath edge for support...

If I have to rip it all off, is there a tool to do that easily or should I just chip away at it by hand like an old-time mason like I did the tiles?

And in this case, what are my options for building up again with? If applying cement/sand render is as hard as plastering (where you're racing against the clock), I'm not sure if I could successfully create a substrate that was "flat to within 3mm per 10m2" as I've read it should be. If I have to use tilebacker board (expensive, but more so than hiring someone to render?), how do I fix the screws to the blockwork correctly? I think normal plasterboard is not quite strong enough because I read that it can take at most "natural stone and adhesive with a maximum thickness of 10mm", although maybe that's a misprint and the adhesive isn't included in the 10mm width. ( Is there a weight limit when tiling a wall? )

Finally, do I need a tanker like Lastogum and a primer withn the stuff I've got?

All answers gratefully appreciated :8:
 

Attachments

  • A.jpg
    168.6 KB · Views: 113
  • B.jpg
    186.8 KB · Views: 100
  • C.jpg
    164.5 KB · Views: 98
  • D.jpg
    172.1 KB · Views: 101
  • E.jpg
    259.9 KB · Views: 111
  • F.jpg
    148.6 KB · Views: 88
  • G.jpg
    241.4 KB · Views: 96
Last edited by a moderator:
A

Alexyz

Thanks all. I was expecting to be told that, so don't worry about it! If it all has to come off, this is how I was thinking of going about it...

Firstly, the substrate under the finishing plaster I have only assumed to be plaster, because it crumbles when pushed into. It's beige, and went darker and pinker when pva'd. If there's a chance this is actually render, please do let me know before I rip it all off!

So, I was thinking of buying a cheap angle grinder and using this to cut into the plaster to make a square so I can slip my 76mm wide 'electrician's chisel thing' (the technical term) between block and plaster to pull the plaster off. I can use this also to give me a straight edge where my stone will meet the retained existing plaster. Then screw and adhere aqua board or equivalent to the block. (I would use cement/sand render but I read you have to wait 2 weeks for it to dry out before tiling) Any tips on the size of screws required, spacing and type of rawl plugs, the cheapest suitable board, adhesives and tape to get, whether I need to prime the board before applying my Tilefast 6 Flex adhesive etc? I'll buy from Travis Perkins or Screwfix, unless you guys know of a better supplier who can deliver quickly and cheaply.

Another idea: I was also wondering if it's possible to leave the plaster up, but screw on 6mm tile backer board with long screws going all the way into the blockwork. Would that little innovation be sound or not? This would give me a 19mm build up of 6mmboard/3mmadhesive/10mmslate which would look accceptable and actually would help me out because there is a gap between the bath and sink unit that would then disappear so I wouldn't have to rebuilt the entire unit and move the toilet etc.
This kind of thing would be useful to discuss for me because I'm also redesigning my parent's bathroom for them. They live in a listed building, so if I leave the original lathe & plaster on the wall and just screw tile backer board over the top then I won't have to apply for Listed Building Consent because I won't have altered the existing fabric, so I won't have to wait 3 months for the council to make a decision only to potentially be told no. :smilewinkgrin:
 
Last edited by a moderator:
W

White Room

Thanks all. I was expecting to be told that, so don't worry about it! If it all has to come off, this is how I was thinking of going about it...

Firstly, the substrate under the finishing plaster I have only assumed to be plaster, because it crumbles when pushed into. It's beige, and went darker and pinker when pva'd. If there's a chance this is actually render, please do let me know before I rip it all off!

It could be either, just because it may be render dos'nt mean it's strong, all depends on the mix at the time and quality of the sand.

So, I was thinking of buying a cheap angle grinder and using this to cut into the plaster to make a square so I can slip my 76mm wide 'electrician's chisel thing' (the technical term) between block and plaster to pull the plaster off. I can use this also to give me a straight edge where my stone will meet the retained existing plaster. Then screw and adhere aqua board or equivalent to the block. (I would use cement/sand render but I read you have to wait 2 weeks for it to dry out before tiling) Any tips on the size of screws required, spacing and type of rawl plugs, the cheapest suitable board, adhesives and tape to get, whether I need to prime the board before applying my Tilefast 6 Flex adhesive etc? I'll buy from Travis Perkins or Screwfix, unless you guys know of a better supplier who can deliver quickly and cheaply.

Another idea: I was also wondering if it's possible to leave the plaster up, but screw on 6mm tile backer board with long screws going all the way into the blockwork. Would that little innovation be sound or not? This would give me a 19mm build up of 6mmboard/3mmadhesive/10mmslate which would look accceptable and actually would help me out because there is a gap between the bath and sink unit that would then disappear so I wouldn't have to rebuilt the entire unit and move the toilet etc.
This kind of thing would be useful to discuss for me because I'm also redesigning my parent's bathroom for them. They live in a listed building, so if I leave the original lathe & plaster on the wall and just screw tile backer board over the top then I won't have to apply forCons Listed Building consent because I won't have altered the existing fabric, so I won't have to wait 3 months for the council to make a decision only to potentially be told no. :smilewinkgrin:

Check out before you do anything to a grade 2 listed building

Where from London are you
 
A

Alexyz

Thanks all.

It could be either, just because it may be render dos'nt mean it's strong, all depends on the mix at the time and quality of the sand.
What sand and mix is best please?

About the listed building, it's grade 2, which still means that you have to retain all existing details including old plaster and floorboards etc, you can't even strip wood without permission! But the council told me you can replace any modern bathroom fittings without consent- you'd only need consent if by changing the locations of sanitary fittings you'd have to alter existing fabric or have new downpipes outside etc. I'm using the existing plumbing, just changing the units... and hopefully backer board can be fixed over some areas of walls so they can be tiled. I'm East London and my parents are *********.
 
A

Alexyz

The substrate is blockwork, don't know what type but do you know a sand and mix that is ok for block please?

I'm guessing sand cement rendering will be hard, but I can't really afford to get anyone in and I have the time spare. Dad says it's a bit easier than plastering and I've just about managed that the 2 times I've tried (1 finished ceiling over plasterboard, then the repair patch in the pics above). I thought maybe I could nail battens of the desired depth to the wall and fill in between with render, then smooth it with a straight edge run along the battens to ensure it's flat, then remove the battens and fill the gaps they left...
 
A

Alexyz

Thanks. I've been trying to find a suitable sand and mix for block but ratios used on here and the web seem to vary between 1:3 and 1:6, and I'm not sure what sand I'd need. What sand and mix would you guys recommend for blockwork?

The question is, do tile backer boards last as long as sand/cement render? Would a tiled surface on backer board last 20,50,100 years, or would the wall need redoing after 10 years? That's quite important to me, that I don't have to replace good tiles in the future.

I'm interested in the more no-nonsense cement boards without the foam in the middle, like Hardibacker. Something I could adhere and screw to the block, and preferably doesn't even need priming would be perfect. I could fit out all surfaces with Hardibacker for £90, plus cost of tape and screws etc. I'm guessing that would be a lot cheaper than hiring someone to render, and more importantly I could tile immediately instead of waiting a few weeks, so I'd have a bathroom quickly. It's just my question mark over longevity that I'm concerned with. What do you think?
 
Last edited by a moderator:
W

White Room

It depends on the blocks, thermalite need a weaker mix than say concrete blocks which would take a stronger render.

If you need a rendering/plastering sand B+Q do it in bags at there larger depots, a 4 sand and 1 cement would suffice mixed in a mixer not by hand it dos'nt work as well.

You would also need some febmix to add to the s/c but watered down first.

Should'nt worry about 20years let alone 100, fashions change
 
A

Alexyz

Also here's a pic of it so far. Going to wire brush the plaster residue off tomorrow.

My question is, should I take off the plaster on the third wall too (the one with the mirror on)? Or is it ok on this wall to hardieboard over the plaster and tile? It's the opposite end of the bath from the showerhead, and above a ledge 300mm deep from the bath. The sink is on that ledge though. Thanks.
 

Attachments

  • bathwall.jpg
    494.3 KB · Views: 79
A

Alexyz

I rendered all the walls myself in the end, because no-one answered my question on how much a tradesman would charge to do it so I assumed £££. I'm glad, it was good to learn a new skill... knackering and painful, but good!

In case any other hardcore DIYers wants to do the same, this is how I did it, don't know how right it was but it worked, feel free to correct me if I did anything wrong so I know for next time:

REMOVING THE PLASTER
-Removed all plaster from walls with hammer & bolster (3 days work!) (started on sat morn so couldn't hire a small breaker and figured it'd take ages to find out where to get one from anyway)
-Cleaned residual plaster off with wire brush. Got through two different brushes on this job, they didn't last long. Sprayed wall with water mister (a reused Ecover spray bottle) just a little to reduce dust. Spraying too much will just make it spread around though.
-Removed hard-to-remove plaster with wire brush fitting on a cheap angle grinder. Where the plaster was attached to patches of render rather than block it was much harder to remove- it was also crystalline so I assume some sort of chemical reaction goes on when plaster is applied over s/c render which makes the plaster harder and crystalline.
-The job of cleaning the blockwork took 2 or 3 days in total. A real drag, using the angle grinder brush was about twice as quick but it filled the room with dust in minutes and wore away the blockwork so easily. Made an awful mess, not worth it for the DIYer.

MIXING RENDER
-Rendered using a 5:1 mix (plasterer's sand: general cement)
-Didn't hire a mixer due to cost and incovenience. Instead I mixed the s/c dry in an empty transparent plastic sand bag using a technique of cutting back and forth with a trowel, then turning a corner over, then cutting again, until the mix was entirely the same colour. This was hard work, but I was thorough so I believe it was mixed better than a mixer could.
-Each time I would do 2 bags. Each bag would be filled with 2 small saucepans of sand, then 1 of cement, then 3 of sand on top (I had found this to be the right amount for me to get on the wall before the cement went). I did 2 smaller bags instead of 1 big one because it was too hard to mix all in the same bag.
-Half of the required water for 1 bag was poured into a bucket. Then 1 bag emptied into it. The second half of the water was then added, and the mix mixed. Then half of the required water for the second bag was added, then the second bag added, then the whole thing mixed and a bit more water added as required (some of the sand was a little wet hence the need to carefully gauge the final amount of water- be careful because the render can trick you by appearing to be perfect, but then somehow become too sloppy after a few minutes, so be aware that it will get a little sloppier and use only the minimum water, because it won't be able to spread thickly if it's too sloppy).

TECHNIQUE FOR MAKING A FLAT WALL
-I basically copied a traditional technique shown in a Youtude video (search 'rendering a wall' or something), except I developed a more accurate technique for making my columns, and I splatted my blobs on with a plasterers trowel instead of flinging them witha saucepan!
-Made columns of render so I could saw a straight edge along them to ensure a flat surface. This is how:
-Hung a plumbline from the ceiling where the edge of the old plaster used to be near one corner of the wall.
-Hammered pairs of nails at the top, bottom and centre of the plumbline until they were all in line with the string.
-Repeated this at the other corner, and in the centre, to match the length of my straight edge (just a straight piece of wood that used to be a bed slat!)
-Splattered blobs of render to make a column in line with the nails, then pressed the blobs down to the level of the mails to make it vertically straight. The blobs will fall off unless you splat them on really hard.
-The next day, splattered blobs of render in a spotty fashion so they had room to squish, then sawed up and down my columns with my straight edge to make the blobs level. When the blobs were all on, splatted into the gaps and sawed level. Used same technique for all walls

TIME AND MONEY SPENT

-The entire process took me almost 3 weeks!!! But the first week was 'wasted' researching and taking off the tiles before I knew I needed to take the plaster off with them, so it would have been about 2 weeks if I had known what I was doing from the beginning.
-I wonder how that compares to how much it would cost to just pay someone in to do it?! Does anyone know how much it would've cost? As I am unemployed at the moment, I have all the time in the world so time wasn't a problem for me.
-The sand and cement cost about £50, and I spent another £50 buying stuff I needed from screwfix that I didn't already have, such as the grinder etc.

SHOULD OTHER DIYERS TRY THIS?
-Only if you are hardcore! By the time I had finished rendering, I had a surface flatter than the plaster it replaced, completely flat along the straight edge in all directions. However, I had to invest time preparing and work carefully to achieve this.
-It's really hard labour for someone whose body isn't used to it. I ached every night. The worst part was my fingers, which swelled up so much that I felt I had to soak them in cold water every morning and night to reduce swelling. The swelling gradually reduced once I'd finished and my hands were alright again after about a week, hopefully with a few new muscles in them!

Anyway, there you go. I left it for a few weeks to dry out and I've just started tiling now. I have a question about that but I'll ask it in a new post because this one is so long that it might get lost. Thanks for your help with the advice earlier on.:8:
 
A

Alexyz

Alright, so here's my problem with the tiles. I've put about 30 of my slate 400x400x10mm tiles on already around my shower area.

However, I've found today that 6 of them that I stuck on earlier this week aren't properly stuck to the wall. They seemed fine when I stuck them on I think, but now they sound hollower at the top edge and can be seen to flex very slightly when pushed at the top. The bottoms feel as solid as the other tiles.

I pulled one of them off today that I had applied yesterday and found it easily came straight off, with all the adhesive staying on the wall and none on the tile. As a test, I spread a thin layer of adhesive over the old adhesive and spread a thin layer on the tile too, then pushed the tile back on. Is this an ok thing to do? I'll see how well it's stuck tomorrow.

Here's my thoughts on what might be wrong:
1. Maybe the tiles were put up too late when the adhesive had lost stick? 4 of the faulty tiles were all done at the same time, so maybe I spent too long applying the adhesive that time? However, I only did 4 tiles at a time, mixing enough adhesive for 4 tiles each time in a clean container... and the other ones that don't seem stuck properly are all from different batches... so I don't understand how this could happen.
2. Maybe the tiles have a thin layer of quarry dust on their keyed back? However, nothing seems to come off when I wipe my hand across the back.
3. Maybe the adhesive I was sold is out of date? It says 28.05.09 on the pack, but that might be the date the batch was made which would mean it would be good for a year after, or maybe it's not even a date or relates to something else.
4. Maybe I should be back buttering the tiles? I'm pretty sure I wasn't told to do so in the supplier's instructions. I back buttered the row of 4 tiles I did today to see if it helps.
5. Maybe I squished these tiles too much such that they lost contact with the adhesive? I was pressing them all over and in corners to get them level with neighbouring tiles, maybe I shouldn't've done that? However, then wouldn't the tile that I took off have had some adhesive attached where contact hadn't been lost?
The tiles are Kirkstone Rio Neblina Cleft and the adhesive is the PCI Tilefast 6 Flex that they sell to go with them.

Some advice would really be appreciated, I've spent so long on this that I'll be devastated if I mess up the tiling... the tiles cost me £500... :helpsmilie:
 
This thread hasn't been replied to for 14 days, so replying to this one may not get a response. Post a new thread instead.

Reply to Advice needed please! Stone, plaster, block in the UK Tiling Forum area at TilersForums.com

There are similar tiling threads here

I will be tiling with 60*30 procelain tiles. They weight about 3.57kg each which is about...
Replies
2
Views
575
    • Like
    • Useful
Hi, Im looking for a recommendation for a liquid tanking. I have to use a liquid tanking...
Replies
1
Views
591
    • Like
Renovated the bathroom on my 1970 bungalow last year. Took up the old pink floor tiles with sds...
Replies
24
Views
2K
I've recently bought Johnson 'Orkney Stone' ceramic floor tiles from B&Q. Paid to have them...
Replies
6
Views
1K
Hi people I'm in desperate need of advice So my builder who I let go due to poor work has...
Replies
3
Views
1K

Trending UK Tiling Threads

UK Tiling Forum Popular

Advertisement

Tilers Forums on FB

...

You're browsing the UK Tiling Forum category on TilersForums.com, the tile advice website no matter which country you reside. Our UK based online tiling forum has 48,000 members and started out in 2006.

Top