I rendered all the walls myself in the end, because no-one answered my question on how much a tradesman would charge to do it so I assumed £££. I'm glad, it was good to learn a new skill... knackering and painful, but good!
In case any other hardcore DIYers wants to do the same, this is how I did it, don't know how right it was but it worked, feel free to correct me if I did anything wrong so I know for next time:
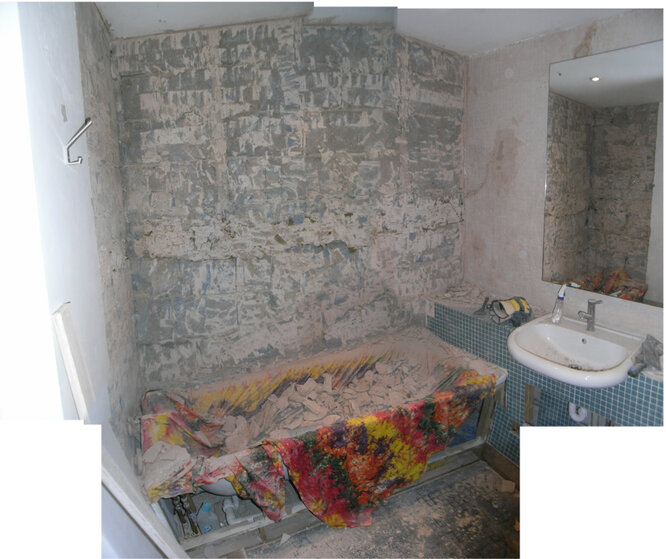
REMOVING THE PLASTER
-Removed all plaster from walls with hammer & bolster (3 days work!) (started on sat morn so couldn't hire a small breaker and figured it'd take ages to find out where to get one from anyway)
-Cleaned residual plaster off with wire brush. Got through two different brushes on this job, they didn't last long. Sprayed wall with water mister (a reused Ecover spray bottle) just a little to reduce dust. Spraying too much will just make it spread around though.
-Removed hard-to-remove plaster with wire brush fitting on a cheap angle grinder. Where the plaster was attached to patches of render rather than block it was much harder to remove- it was also crystalline so I assume some sort of chemical reaction goes on when plaster is applied over s/c render which makes the plaster harder and crystalline.
-The job of cleaning the blockwork took 2 or 3 days in total. A real drag, using the angle grinder brush was about twice as quick but it filled the room with dust in minutes and wore away the blockwork so easily. Made an awful mess, not worth it for the DIYer.
MIXING RENDER
-Rendered using a 5:1 mix (plasterer's sand: general cement)
-Didn't hire a mixer due to cost and incovenience. Instead I mixed the s/c dry in an empty transparent plastic sand bag using a technique of cutting back and forth with a trowel, then turning a corner over, then cutting again, until the mix was entirely the same colour. This was hard work, but I was thorough so I believe it was mixed better than a mixer could.
-Each time I would do 2 bags. Each bag would be filled with 2 small saucepans of sand, then 1 of cement, then 3 of sand on top (I had found this to be the right amount for me to get on the wall before the cement went). I did 2 smaller bags instead of 1 big one because it was too hard to mix all in the same bag.
-Half of the required water for 1 bag was poured into a bucket. Then 1 bag emptied into it. The second half of the water was then added, and the mix mixed. Then half of the required water for the second bag was added, then the second bag added, then the whole thing mixed and a bit more water added as required (some of the sand was a little wet hence the need to carefully gauge the final amount of water- be careful because the render can trick you by appearing to be perfect, but then somehow become too sloppy after a few minutes, so be aware that it will get a little sloppier and use only the minimum water, because it won't be able to spread thickly if it's too sloppy).
TECHNIQUE FOR MAKING A FLAT WALL
-I basically copied a traditional technique shown in a Youtude video (search 'rendering a wall' or something), except I developed a more accurate technique for making my columns, and I splatted my blobs on with a plasterers trowel instead of flinging them witha saucepan!
-Made columns of render so I could saw a straight edge along them to ensure a flat surface. This is how:
-Hung a plumbline from the ceiling where the edge of the old plaster used to be near one corner of the wall.
-Hammered pairs of nails at the top, bottom and centre of the plumbline until they were all in line with the string.
-Repeated this at the other corner, and in the centre, to match the length of my straight edge (just a straight piece of wood that used to be a bed slat!)
-Splattered blobs of render to make a column in line with the nails, then pressed the blobs down to the level of the mails to make it vertically straight. The blobs will fall off unless you splat them on really hard.
-The next day, splattered blobs of render in a spotty fashion so they had room to squish, then sawed up and down my columns with my straight edge to make the blobs level. When the blobs were all on, splatted into the gaps and sawed level. Used same technique for all walls
TIME AND MONEY SPENT
-The entire process took me almost 3 weeks!!! But the first week was 'wasted' researching and taking off the tiles before I knew I needed to take the plaster off with them, so it would have been about 2 weeks if I had known what I was doing from the beginning.
-I wonder how that compares to how much it would cost to just pay someone in to do it?! Does anyone know how much it would've cost? As I am unemployed at the moment, I have all the time in the world so time wasn't a problem for me.
-The sand and cement cost about £50, and I spent another £50 buying stuff I needed from screwfix that I didn't already have, such as the grinder etc.
SHOULD OTHER DIYERS TRY THIS?
-Only if you are hardcore! By the time I had finished rendering, I had a surface flatter than the plaster it replaced, completely flat along the straight edge in all directions. However, I had to invest time preparing and work carefully to achieve this.
-It's really hard labour for someone whose body isn't used to it. I ached every night. The worst part was my fingers, which swelled up so much that I felt I had to soak them in cold water every morning and night to reduce swelling. The swelling gradually reduced once I'd finished and my hands were alright again after about a week, hopefully with a few new muscles in them!
Anyway, there you go. I left it for a few weeks to dry out and I've just started tiling now. I have a question about that but I'll ask it in a new post because this one is so long that it might get lost. Thanks for your help with the advice earlier on.:8: