Discuss Eeeek Advice appreciated please in the Canada Tile Advice area at TilersForums.com.

Hi

I've had a leak from the shower to the room below. I thought it was likely the Silicon seal first, so redid all Silicon and removed and refitted shower enlosure.

The leak came back, so I cut out the ceiling below to see what the problem was. The drips were coming though the bottom of the plaster. So I taped a plastic sheet over the offending shower wall as a temporary measure and it was bone dry since. I tested the Silicon seal again and that was fine too. I've now removed the sheet and its leaking again. So even though the grout was rock solid (could barely scratch it wiht a stanley knife) I'm pretty sure its the grout. No cracks in the tiles either.

I bought a multi-tool today with grout attachment and some Kerakoll Fugabella, with the intention of removing and re-grouting.

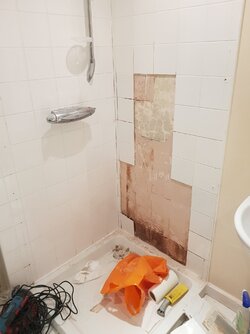
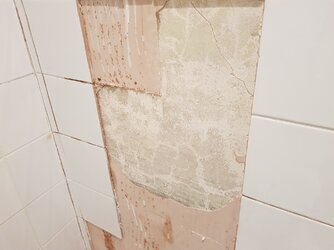
The bottom few tiles came away as I removed the grout. I kind of expected that but as I've raked the grout further up the walls the tiles are simply coming away. It's also taken what looks like a 1mm plaster skim away from the original plaster.

The house was renovated just before I moved in, and bathroom completely new 14 years ago. I don't think it's tanked at all (sorry I am not a tiler so have not much clue with this - be gentle!)

I'm concerned I'm going further down the rabbit hole, but want to repair if I can rather thna give up at the first hurdle and call in the pro's. I don't want to bodge it though.

My questions...

1) Shall I carry on removing the grout, removing any loose tiles with a view to fixing them back?

2) What should be under those tiles? It looks at the moment to be a very thin skim on top of the solid old wall

3) The tiles are 147mm x 147mm 5mm thick. I can't find any of these online, just lots of 150mm and these are all 147mm. Any ideas? Removing the adhesive on these will be a ballache.

All good advice greatly appreciated. Thanks!
 

Attachments

  • 20210129_195135 - Copy.jpg
    336.6 KB · Views: 76
  • 20210129_195142 - Copy.jpg
    293.5 KB · Views: 68
  • 20210129_195156 - Copy.jpg
    250.1 KB · Views: 67

Dave

TF
Staff member
Esteemed
Arms
Subscribed
389,929
1,000,000
Co.Durham
You can see where you have the most ingression. This needs to be removed and allow the substrate to dry. It could also be behind the tray. The last thing you want is mould growing. Personally i would remove the tray and sort the substrate out and remove all the tiles. Tank the walls and retile , you can get some cheap enough tiles if cost is an issue. I think the installation you have is passed its life span.
 
You can see where you have the most ingression. This needs to be removed and allow the substrate to dry. It could also be behind the tray. The last thing you want is mould growing. Personally i would remove the tray and sort the substrate out and remove all the tiles. Tank the walls and retile , you can get some cheap enough tiles if cost is an issue. I think the installation you have is passed its life span.
Thanks Dave
Are these Mapei shower waterproofing kits any good? Mapei Shower Waterproofing Kit - https://www.screwfix.com/p/mapei-shower-waterproofing-kit/78484
 
Thanks Cris.
Was going to hack off all the tiles, get plaster reskimmed, then go with a Mapei showerproof kit.
Adding board might mean I need to move the tray? and therefore floor tiles.
I'm no trying to bodge it, but would rather not rip out the other bits which aren't a problem.
Would re-skim the low spots, prime/cover with the Mapegum tanking stuff work too?
 
Don't worry about the reskim, Remove the loose/affected skim, prime the wall. stick some 6mm backer boards to the wall and mechanically fix then tank the joins & fixings. A proper skim would be 3/4mm and you would need to let it dry for at least a week before even thinking about tiling, so your only really losing another 2mm using backer board and you've got plenty of room on the tray and could tile as soon as the tanking is dry.
 
Something is causing that to happen apart from not being proper waterproofed. You will have to find out what exactly causes the water leakage. If you ignore the real reason, it will not get fixed and you will get the same down the road.
 
Hi - Thanks, yes I've found it was the grout.
Process of elimination over months, and removing some of the ceiling below. I can see the water is dripping down through the plaster.
Using waterproof tape and plastic sheet over the tiles on that wall stopped the leak instantly. So not water pipes, the shower itself, the waste or the Silicon seal. All these have been discounted.
No cracks in the tiles either.
Even though the grout looked ok and is really hard, once the tiles have bene removed the damp patches have correlated with the grout lines.
So by tanking the wall and fixing new tiles and grout (kerakoll fugabella) I'm counting on that fixing the issue. Unless you have any other suggestions I don't see what else there could be?
 
Hi

I've had a leak from the shower to the room below. I thought it was likely the Silicon seal first, so redid all Silicon and removed and refitted shower enlosure.

The leak came back, so I cut out the ceiling below to see what the problem was. The drips were coming though the bottom of the plaster. So I taped a plastic sheet over the offending shower wall as a temporary measure and it was bone dry since. I tested the Silicon seal again and that was fine too. I've now removed the sheet and its leaking again. So even though the grout was rock solid (could barely scratch it wiht a stanley knife) I'm pretty sure its the grout. No cracks in the tiles either.

I bought a multi-tool today with grout attachment and some Kerakoll Fugabella, with the intention of removing and re-grouting.

The bottom few tiles came away as I removed the grout. I kind of expected that but as I've raked the grout further up the walls the tiles are simply coming away. It's also taken what looks like a 1mm plaster skim away from the original plaster.

The house was renovated just before I moved in, and bathroom completely new 14 years ago. I don't think it's tanked at all (sorry I am not a tiler so have not much clue with this - be gentle!)

I'm concerned I'm going further down the rabbit hole, but want to repair if I can rather thna give up at the first hurdle and call in the pro's. I don't want to bodge it though.

My questions...

1) Shall I carry on removing the grout, removing any loose tiles with a view to fixing them back?

2) What should be under those tiles? It looks at the moment to be a very thin skim on top of the solid old wall

3) The tiles are 147mm x 147mm 5mm thick. I can't find any of these online, just lots of 150mm and these are all 147mm. Any ideas? Removing the adhesive on these will be a ballache.

All good advice greatly appreciated. Thanks!
Hi there,
I'm afraid it's game over for that installation which looks poorly done in the first place. I'm very surprised it lasted 14 years, so I think you have admit that it's had it's day, and look to re-tiling the area. I'd start fresh with some cement boards or let the plasterboard dry out and then tank it, providing it's rigid and sound. Then tile it.
 
Hi

I've had a leak from the shower to the room below. I thought it was likely the Silicon seal first, so redid all Silicon and removed and refitted shower enlosure.

The leak came back, so I cut out the ceiling below to see what the problem was. The drips were coming though the bottom of the plaster. So I taped a plastic sheet over the offending shower wall as a temporary measure and it was bone dry since. I tested the Silicon seal again and that was fine too. I've now removed the sheet and its leaking again. So even though the grout was rock solid (could barely scratch it wiht a stanley knife) I'm pretty sure its the grout. No cracks in the tiles either.

I bought a multi-tool today with grout attachment and some Kerakoll Fugabella, with the intention of removing and re-grouting.

The bottom few tiles came away as I removed the grout. I kind of expected that but as I've raked the grout further up the walls the tiles are simply coming away. It's also taken what looks like a 1mm plaster skim away from the original plaster.

The house was renovated just before I moved in, and bathroom completely new 14 years ago. I don't think it's tanked at all (sorry I am not a tiler so have not much clue with this - be gentle!)

I'm concerned I'm going further down the rabbit hole, but want to repair if I can rather thna give up at the first hurdle and call in the pro's. I don't want to bodge it though.

My questions...

1) Shall I carry on removing the grout, removing any loose tiles with a view to fixing them back?

2) What should be under those tiles? It looks at the moment to be a very thin skim on top of the solid old wall

3) The tiles are 147mm x 147mm 5mm thick. I can't find any of these online, just lots of 150mm and these are all 147mm. Any ideas? Removing the adhesive on these will be a ballache.

All good advice greatly appreciated. Thanks!
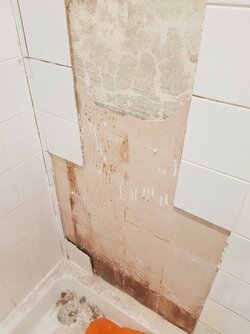
Also, check for movement in the tray before you do anything. That tray will be on feet, and if you've had a leak, then more than likely, the wooden flooring will be damaged or rotten underneath and unstable.
Personally, I'd take the tray out, look at the base floor it's sat on and repair if unstable or let the floor dry out fully. If the floor is unstable, or moves, then the Silicon seal to the tray will always split and cause water ingress by capillary action which will rise through the bottom course of tiles, and cause tile failure. Which I think was the initial cause. Small amounts of water from a failed Silicon joint: drawn up the tiles, and also damaged the floor underneath. I'd seriously consider taking out the tray, re-boarding walls and possibly the floor, then tile again.
In short, it's going to be quicker to start over.
 

Reply to Eeeek Advice appreciated please in the Canada Tile Advice area at TilersForums.com

Subscribe to Tilers Forums

There are similar tiling threads here

First time tiling, lots of mistakes, but most of them have been resolved in a timely fashion so...
Replies
3
Views
311
Hi, Looking for advice mainly on how much adhesive I should remove from between the tiles in a...
Replies
1
Views
1K
    • Like
First time poster here. For some context, I have a (mostly finished) tiny home with some really...
Replies
6
Views
809
    • Like
Renovated the bathroom on my 1970 bungalow last year. Took up the old pink floor tiles with sds...
2
Replies
25
Views
3K
I will be tiling with 60*30 procelain tiles. They weight about 3.57kg each which is about...
Replies
2
Views
888

Advertisement

Thread starter

Joined
Location
UK
What member type are you?
  1. Homeowner

Thread Information

Title
Eeeek Advice appreciated please
Prefix
N/A
Forum
Canada Tile Advice
Start date
Last reply date
Replies
22

Which tile adhesive brand did you use most this year?

  • Palace

    Votes: 9 6.1%
  • Kerakoll

    Votes: 14 9.5%
  • Ardex

    Votes: 11 7.4%
  • Mapei

    Votes: 44 29.7%
  • Ultra Tile

    Votes: 17 11.5%
  • BAL

    Votes: 35 23.6%
  • Wedi

    Votes: 3 2.0%
  • Benfer

    Votes: 2 1.4%
  • Tilemaster

    Votes: 21 14.2%
  • Weber

    Votes: 18 12.2%
  • Other (any other brand not listed)

    Votes: 15 10.1%
  • Nicobond

    Votes: 7 4.7%
  • Norcros

    Votes: 3 2.0%
  • Kelmore

    Votes: 4 2.7%

Birthdays

Top