Very nice that's what I was looking at trying to achieve but what would I use to form the curve off the floor ....it's in an upstairs bathroom..
Just to go back to the curved plinth for a min, I think you may need a little more info, now that I know what you hope to achieve.
the transition between the wall and floor must be 90 degrees and must be uniform in its arc! otherwise as you roll the sheet round the former the mosaic sheet will twist in relation to the floor.
So.... Start by finding the highest point of your floor,
next find something with the radius of the arc you wish to create. Be careful you don't make it too small tho. Depending on the size of mosaic the radius will need to be different. e.g. The radius required by 10x10mm can be smaller than the one required for 20x20mm the result in the arc being too small will make the tiles bunch together and u will loose your grout joint!
Next, place your arc former hard against the wall, cove and floor, then Mark a line at the top of the arc former on the wall. Then you will need to place a baton on the full length of the wall, so that the bottom of the baton is on the Mark u've made with the arc former. Make sure you fix the baton dead level. I was taught to use a wheel but I adapted the idea to make life easier, for me anyway. I found a wheel a bit cack handed. Reason being is that the next process is very fiddly.
What you need to do is load up the cove that you fixed earlier with a fairly wet mix if adhesive.
Then holding your arc former HARD against the wall and push it up to the baton. So that as you pull the former thro it not only forms your arc over the cove but also leaves a solid bed of adhesive beneath it on the floor. This will create a perfect 90 degree angle between wall and floor. After u've pulled it thro you can feather off the adhesive on the floor into your existing floor. But u must feather it from where the bottom of the arc forms the new floor level. Does that make sense?
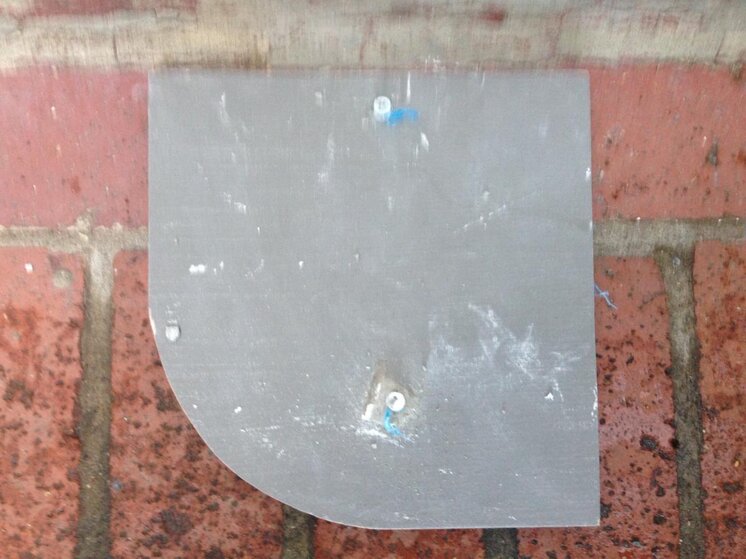
This is what I used on the pink 10x10s perhaps it'll make my description clearer.
i found a machined piece of timber with a perfect 90 degree corner. Then placed my arc former on top and shaped the timber around it. That way I have a straight edge to not only place against the wall but up to my baton also. And it gives a flat bed of adhesive beneath it, which can now be feathered off at the bottom of the arc.
make no mistake it is NOT easy, it's fiddly and takes practice. Try not to fiddle with it once u've pulled it thro too much. U can smooth it off once it's dry, it will look imperfect at first. And remember with mosaic, every undulation in the surface behind will be transferred to the finished surface, so it must be as smooth as u can make it!
And good luck!