is tubbed gear ok for glass? mosaic fix is for mosaics,surely using a darker adhesive will dull the glass colour or am i wrong here. i use white addy,,trowelk it on to acheive bed depth then smooth it over with trowel so ribs dont show throo,
tubbed adhesive is not suitable for fixing glass mosaics....glass is non porous so it needs a suitable polymer modified adhesive to successfully adhere. also some glass tiles as you know, have an epoxy coloured paint which also needs to be taken into consideration too
you always should back skim larger glass tiles to avoid shading or lay on the adhesive on the wall and lay it flat with the flat side of the trowel to take any lines out which would also cause shading..
Ed... sorry kilty, ignore the last sentence as you already do that mate :0) but its a handy tip for any new readers..
Generally I would agree though last year I fixed some Wickes glass mosaics and it said on the box to use a ready mixed adhesive not a cement based one. Something to do with the coloured coating on the back of the tiles I expect.
i didnt think so,i would take what wickes tell you with a pinch of salt,,unless i stand corrected and the tiles you had were different in some way ive never fixed glass with tubbed addy always white cement based
Cheers. Dont worry theres always a way round problems. I used to get really stressed about jobs but if you take your time and seek avise youll be fine
I wont try and exlain the dog tooth method. ill wait for one of the moderators / more regular posters to describe as there might be a picture that someone can post.
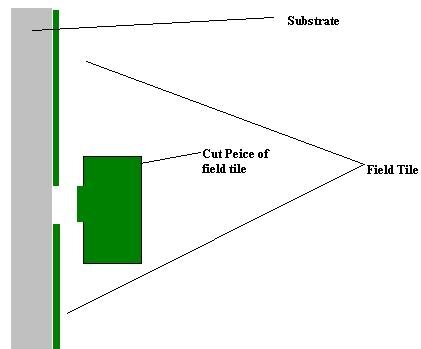
- Tile field tiles up to where the border is.
- Measure the height of border / mosaic
- Baton above where the border will be and tile as normal
- Now you will have tiled the whole room and have a gap where the border / mosaic is going to be
- Then the clever bit. Fill the gap with adhesive - (powder).
- Cut a tile (or anything for that matter) with a piece sticking out that fits into the space for the mosaic that will leave the required depth of addy. So in affect your cut tile will removing excess addy from the gap leaving the perfect depth to fit the mosaic. Ive attached an image that will show it better than i can explain it :lol:
You can then either press it straight into the wet addy or leave it to go off and tile once set